14 Mei 2013

   Advances in health technology are often a double-edged sword. They provide new ways to improve patient care but also create new opportunities for harm if design flaws aren't identified and fixed, equipment isn't properly maintained, or safety and usage protocols aren't followed. To help minimize the chance of adverse events, ECRI Institute of Plymouth Meeting, Pennsylvania, an independent nonprofit organization that studies improvement to patient care, has named the Top Ten Health Technology Hazards for 2013.
   The hazards were chosen on the basis of potential for injury or death, frequency of occurrence, how many patients are affected, notoriety in the media, and measures hospitals can take to lessen these risks.

Alarm Hazards
   Alarms on infusion pumps, ventilators, and other devices are designed to inform medical staff of a problem that needs prompt attention. But the sheer number of alarms in a hospital can overwhelm staff, leading to complacency and delayed response. Caregivers often turn down the volume of alarms.
   "If too many alarms are sounding, then all alarms start to lose their meaning," said Rob Schluth, Senior Project Officer of ECRI's Health Devices Group. "Focus on reducing audible alarms for events that don't require action on the part of the staff. Perhaps a visual indicator is sufficient for some conditions.
   "Facilities can fix problems that cause alarms to sound in the first place," he said. "For example, reinforcing skin prep techniques and replacing electrodes on a regular basis can prevent ECG leads from coming off and thus prevent leads-off alarm conditions from developing."

Medication Administration Errors Using Infusion Pumps
   Infusion devices are the subject of more adverse incident reports to the US Food and Drug Administration than any other medical technology, according to the Association for the Advancement of Medical Instrumentation. From 2005 through 2009, more than 700 deaths associated with infusion devices were reported.
   Data-entry mistakes such as mistyping information or entering it into the wrong field can be dangerous. Errors are caused by illegible orders or drugs that are improperly prepared or given to the wrong patient.
   "It's essential to build in time and resources for clinical and technical staff to determine which data flows will meet clinical needs, and then develop and refine workflows, policies, and procedures around using the integrated system," said Erin Sparnon, Senior Project Officer in ECRI's Health Devices Group


Radiation Burns From Diagnostic Radiology Procedures
   Inappropriate use and dose levels of CT can lead to unnecessary radiation exposure for patients. Image quality typically improves as the dose increases. As a result, there is a tendency to use higher doses that are associated with greater risk to the patient. Acute reactions such as radiation burns and hair loss are relatively rare but still occur too frequently, the ECRI report states.
   Radiation-induced burns occur because the radiation beam may stay on the same area of skin for too long, said Jason Launders, Director of Operations of ECRI's Health Devices Group. "Alternative projections can reduce the incidence of burns," he said. "It is difficult to track the dose to a specific area of skin. Fluoroscopy systems keep track of the exposure time and alarm after a pre-set time. The alarms are usually ignored

Patient Data Errors in EHRs and Health IT
   Mistakes that cause one patient's data to end up in another patient's record aren't new.
   "Getting the right patient's data into the right record doesn't just happen automatically," said Rob Schluth. "It requires well-designed systems, careful implementations, and attention to workflow processes. For example, a physiologic monitor may be set up to transmit data to a patient's electronic health record. But what happens when the monitor is connected to a different patient? Or if that patient is moved to a different monitor? Correctly associating and disassociating a device with the patient's record are key steps in the process."

Devices and IT Systems That Don't Interface
   Interfaces between medical devices don't always function as intended and can allow dangerous conditions to exist. For example, ECRI found that one monitoring system didn't communicate audible or visual alarms from an interfaced ventilator to warn caregivers of a critical patient circuit disconnection.
   "Interoperability provides a pathway for good things to be shared across devices and systems," said Rob Schluth. "Patient data and test results can be transmitted without lengthy delays or the need for repeated data entry. Bad things can also travel along those pathways. A fault in one system could affect other connected systems. A pathway could be incomplete, meaning that some vital information isn't transmitted.

Air Embolism Hazards
   Intravascular air embolism is a potentially lethal complication of certain medical and surgical procedures. While relatively rare, fatal incidents do occur. The Pennsylvania Patient Safety Authority found 59 confirmed or suspected air embolism adverse events from 2004 through 2011, including 7 cases of permanent harm and 6 deaths. The largest percentage of reported events is associated with the use of central venous access devices.
   "It's hard to say whether incidents are because of complacency, because specific individuals didn't understand the risks in a particular situation, or because of an unusual combination of factors," said Rob Schluth. "These incidents illustrate that even well-known hazards warrant attention to remind caregivers of the risks, as well as steps to take to minimize them."
   ECRI recommends instituting a time-out procedure for activities that present a high embolism risk, reinforcing the appropriate procedures to follow for removing air from solution delivery systems, and requiring clinicians to trace any line to its source before connecting the line to a patient's IV access device

Using Technology for Adults on Children
   Technology designed for adult patients often needs to be used on children, in some cases because no alternatives exist. Pediatric-specific devices are slow to reach the market because of the small numbers of patients available to study, the devices' high-risk nature, and high development costs.
   Children can be placed at risk when "adult" technologies need to be used in their care. Examples include the use of inappropriate dose settings during radiology procedures, a lack of child-appropriate selection options in medication administration and computerized provider order-entry systems, and the absence of pediatric emergency supplies in care areas where children may be seen.
 
Dirty Endoscopes and Surgical Instruments
   Cross-contamination hazards that occur when flexible endoscopes aren't properly reprocessed have been on ECRI's top 10 hazards list for years. ECRI wants facilities to address the reprocessing function more broadly in their patient safety efforts. Numerous reported incidents involved "dirty" instruments being processed for use in surgery and other medical procedures. The contamination was often not detected until after the item had been used on a patient.
   "It's important that reprocessing staff be taught proper protocols," said Rob Schluth. "It is helpful to explain why each step is needed, describing exactly what can happen if a step is skipped. Frontline workers need to be aware of the hazards.
   "Look at the root causes for any failure. Is the issue that the staff doesn't know the correct procedure, or are other factors contributing to the problem?" he asked. "For example, is sufficient time allotted to perform the procedure correctly, or does staff feel pressured to take short cuts? Are the necessary supplies available? Are the instructions unclear or out of date? Is reprocessing too difficult because the device wasn't adequately precleaned in the procedure room?"

Texting While Performing Surgical Procedures
   Interruptions from pagers and other devices have long been part of medicine, but smartphones and other mobile devices now make it easier for clinicians to be interrupted for non-work-related reasons -- and to make their own interruptions.
   Half of the respondents to a 2010 survey of perfusionists acknowledged texting during heart-lung bypass procedures, with 15% further admitting that they accessed the Internet and 3% reporting that they visited social networking sites during procedures. Additional distractions occur more frequently than people think, exposing patients to danger.
   "These devices can be used for any number of clinically useful purposes," said Rob Schluth. "But they can divert the caregiver's attention away from the patient or the task at hand. Receiving personal text messages or using the devices to check social media during patient care are questionable behaviors. Even the act of focusing on the device rather than observing the patient, or listening to information being exchanged, can affect the quality of care."

Surgical Fires
   There are an estimated 600 surgical fires per year. Although that's only a miniscule percentage of the millions of operations performed, these almost entirely preventable events still occur too frequently. The hazard remains on ECRI's top 10 list because of the potential devastating consequences, including disfigurement and death.
   "A quick assessment of the potential fire risks before the start of a procedure can help staff guard against bringing together the elements of the fire triangle -- oxidizers, ignition sources, and fuel," said Rob Schluth.
Posted by medica chemistry On 21.40 No comments READ FULL POST
   The Hastings Center has updated and expanded its landmark 1987 consensus guidelines for ethical care of terminally ill patients. Oxford University Press published this second edition of The Hastings Center Guidelines for Decisions on Life-Sustaining Treatment and Care Near the End of Life.
   "As the population ages, more people are living with chronic diseases," Hastings Center President and guidelines working group member Mildred Z. Solomon, EdD, said in a news release. "Advances in medicine have created both benefits and burdens, including problems of quality, safety, access, and cost. We need to help patients and families better navigate their choices, and physicians and healthcare leaders must build systems of care that are wiser and more compassionate."
   The guidelines target all healthcare professionals involved in caring for terminally ill patients. They discuss ethical and legal options in the United States for use of life-sustaining technologies, offer comprehensive guidance on informing patients and surrogates of their options, and include detailed strategies to optimize healthcare delivery.
   Issues in end-of-life care include confusion and conflict over decision-making, poor patient–clinician communication, insufficient pain and symptom relief, and use of treatments offering minimal benefit. Consequences of poor care include reduced quality of life, greater family stress, and increased costs of healthcare without added value
   A physician's offer or a family's request to "do everything" may neither respect the patient's rights nor ensure good care. Recognizing religious, cultural, psychological, and social factors affecting medical decision-making can help clinicians provide appropriate, respectful care, according to the guidelines.
   "The guidelines offer a reliable framework for these discussions, and for education, policy-making, and redesign of care," lead author Nancy Berlinger, PhD, a research scholar at the Hastings Center, said in the news release. "They also encourage healthcare leaders and administrators to support better outcomes for patients by building more effective forms of care delivery and integrating care near the end of life into organizational safety and improvement initiatives."

Changes from the 1987 Guidelines
- Recommendations based on the past 25 years of "empirical research, clinical innovation, legal and policy developments, and evolution of professional consensus";
- discussion of decision-making for and about children near the end of life;
- issues specific to patients with disabilities, including the effect of their perspectives on physcian–patient communication and management decisions;
- recent evidence regarding brain injuries and neurological states, how they affect prognosis, and laypersons' misperceptions and unrealistic expectations due to media influences;
- information regarding physician-assisted suicide and how it differs from treatment refusal;
- discussion of controversy regarding palliative sedation;
- acknowledgement that cost is an ethical issue in healthcare decision-making;
- request that hospitals and healthcare organizations develop transparent policies on cost management to avoid bedside rationing; and
- integration of "the insights of ethics and law, medicine and other healthcare professions; the experience of patients and family caregivers; and patient advocacy."

   The 1987 edition of the guidelines set the ethical and legal framework for US medical decision-making and was cited in the Supreme Court's 1990 Cruzan decision. This established patients' constitutional right to refuse life-sustaining medical treatments and affirmed that surrogates could make decisions for patients lacking that capacity.
   In the news release, Kathleen M. Foley, MD, chair of the Society of Memorial Sloan-Kettering Cancer Center, refers to the new guidelines as "the sourcebook for how the ethics of life-sustaining treatment and care at the end of life should be taught, institutionalized, and translated into clinical teaching and practice."
Posted by medica chemistry On 21.26 No comments READ FULL POST

17 Apr 2013

Steven For Medscape

   Although many elderly patients and their families discuss advance care planning (ACP) with their physicians, those wishes often fail to be added to patients' medical records, according to findings from a study carried out in Canada and published online April 1 in JAMA Internal Medicine.
   "To our knowledge, there has been no rigorous audit or evaluation of ACP from the patient or family perspective using validated questionnaires that assess the frequency of engagement in key ACP activities," write Daren K. Heyland, MD, FRCPC, from the Clinical Evaluation Research Unit, Department of Medicine, Kingston General Hospital, Ontario, Canada, and colleagues.
   Aiming to fill that gap in knowledge, these researchers administered in-person questionnaires to 278 elderly patients who were deemed at high risk of dying during the subsequent 6 months. They also surveyed 225 family members associated with the patients. The patients were treated at 12 acute care facilities in Canada between September 2011 and March 2012. Their mean age was 80 years; family members were about 61 years of age.
   Responses to the questionnaires showed that before hospitalization, more than three quarters of the patients (76.3%) had given thought to end-of-life (EOL) care. Only 11.9% expressed a preference for life-prolonging care.
   Of the patients, 47.9% had completed advance care plans, and 73.3% had formally designated a surrogate individual to make decisions regarding their care.
   Even so, of the patients who had talked about their wishes with their families, less than a third (30.3%) had related those wishes to their family physician. Only a bit more than half (55.3%) had discussed their preferences with any member of their healthcare team.
   Of particular note, in only 30.2% of cases were patient/family wishes for EOL care documented in medical records.
   "Many elderly patients at high risk of dying and their family members have expressed preferences for medical treatments at the EOL," the authors write. "However, communication with health care professionals and documentation of these preferences remains inadequate. Efforts to reduce this significant medical error of omission are warranted."
   In an invited commentary that accompanies the article, Theresa A. Allison, MD, PhD, and Rebecca L. Sudore, MD, both from the Division of Geriatrics, Department of Medicine, San Francisco Veterans Affairs Medical Center, underscore the importance of communication between patients, their families, and medical providers.
   "Discussions about goals of care and code status constitute a medical procedure every bit as important to patient safety as a central line placement or a surgical procedure," they write. "Much as we have developed systems to improve patient safety in surgical procedures, we need to develop systematic approaches to discussing patient values and goals of care."
   This study was supported by funding from the Canadian Institutes of Health Research, the Michael Smith Health Services Research Foundation in British Columbia, Alberta Innovates, and the Alternate Funding Plan Innovation Fund in Ontario. The study authors and editorialists have disclosed no relevant financial relationships.
Posted by medica chemistry On 20.43 No comments READ FULL POST

16 Apr 2013

Thomas J. Power, PhD from Medscape

   A recent New York Times analysis of data from the most recent National Survey of Children's Health concluded that almost 1 in 5 teenage boys and 11% of all school-aged children have been diagnosed with attention-deficit/hyperactivity disorder (ADHD). Medscape asked Dr. Thomas Power, from the Children's Hospital of Philadelphia (CHOP), to discuss some theories to explain this increase.
   My name is Tom Power. I'm a psychologist and Director of the Center for Management of ADHD at CHOP. I want to make a few comments about the rising rates of ADHD. At this point, a number of people are commenting that the rates of ADHD may be over 10%. People are asking about factors that may be contributing to that [increase]. Probably the main reason is that providers generally are doing a better job of screening for ADHD. In particular, primary providers and school professionals are doing a better screening for ADHD and bringing to the attention of parents potential concerns about their children.
   The real estimates of ADHD, based upon a number of studies conducted by independent researchers, would suggest that the prevalence is probably in the 5% to 10% range. The best guess may be about 7%, which raises the question as to whether ADHD may be overdiagnosed at this point. I think that these are legitimate questions. Particularly in suburban communities in which more affluent, middle-class and upper-middle-class families reside, there may very well be an overdiagnosis of ADHD. The reasons for that are that a diagnosis of ADHD may be assigned after only a brief screening, which typically would not be appropriate. A comprehensive evaluation is necessary.
   In our center, the approach that we use includes parent and teacher rating scales, as well as a thorough parent interview, consisting of a good medical and developmental history. We strongly recommend that approach to providers in the community.
   Another potential concern is that children with mild problems may be assigned a diagnosis of ADHD. The presence of mildly elevated symptoms of inattention or hyperactivity is typically not sufficient to render a diagnosis of ADHD. There has to be a relatively high level of symptomatology, as well as significant impairment in 2 or more settings to render the diagnosis. I do want to mention that underdiagnosis is also still occurring in certain regions of the country -- in particular, rural areas and underserved inner-city locales. Urban areas are places in which the diagnosis of ADHD may not be made often enough and services may not be provided as much as they should.
   What can we do about the problem of overdiagnosis? First, we need to be conducting more comprehensive assessments, as I described. Second, when children have mild problems, they often need services. They may not need intensive services. They typically would not need medication. We would typically recommend brief parent training using behavioral strategies, perhaps consisting of 2-4 sessions, and school consultation using behavioral strategies. If those methods are not sufficient and the problems get to be more concerning, then more intensive behavioral treatments -- again, using parent training and school consultation -- would be indicated. In some cases, medication, in particular with stimulants, is necessary.
Posted by medica chemistry On 22.45 No comments READ FULL POST
http://reference.medscape.com/


   Ascites (shown) is the accumulation of fluid within the abdominal cavity. For patients with ascites, peritoneal paracentesis is performed to aspirate and analyze the ascitic fluid. It is one of the oldest medical procedures, dating back to approximately 20 BC. The collected fluid can be used to help determine the etiology of ascites, as well as to evaluate for infection or the presence of cancer. Causes of ascites include hepatic cirrhosis, alcoholic hepatitis, heart failure, fulminant hepatic failure, portal vein thrombosis, peritoneal carcinomatosis, inflammation of the pancreas or biliary system, nephrotic syndrome, peritonitis, and ischemic or obstructed bowel.

   Paracentesis is used for patients with ascites to determine etiology, differentiate transudates and exudates, detect the presence of cancerous cells, and/or diagnose suspected spontaneous or secondary bacterial peritonitis. Paracentesis may also be therapeutic in cases of respiratory compromise and abdominal pain or pressure secondary to ascites. Contraindications to paracentesis include an uncooperative patient, uncorrected bleeding diathesis, an acute abdomen that requires surgery, intra-abdominal adhesions, distended bowel, abdominal wall cellulitis at the site of puncture, and pregnancy. Image courtesy of Wikipedia Commons.

   A typical paracentesis/thoracentesis tray is shown. To perform a successful paracentesis, the following equipment is needed: 3 betadine swabs, 2 sterile drapes, sterile gloves, lidocaine 1% (5-mL ampule), a 10-mL syringe, two 22-gauge injection needles, a 25-gauge injection needle, no. 11 scalpel, 8-Fr catheter (over an 18-gauge × 7.5" needle with 3-way stopcock, self-sealing valve, and 5-mL Luer-Lok syringe), 60-mL syringe, 20-gauge introducer needle, tubing set with roller clamp, 3 specimen vials or collection bottles, drainage bag or vacuum container, four 4×4 sterile gauze pads, and a bandage

   There are two recommended areas of abdominal wall entry for paracentesis: 2 cm below the umbilicus in the midline through the linea alba (blue arrow) or 5 cm superior and medial to the anterior superior iliac spine on either side (red arrows). Patients with severe ascites can be positioned supine. Patients with mild ascites may need to be positioned in the lateral decubitus position, with the skin entry site near the gurney.Position the patient in bed with the head elevated at 45-60 degrees to allow fluid to accumulate in the lower abdomen

   Ultrasonography (shown) is recommended to verify the presence of a fluid pocket under the selected entry site in order to increase the rate of success. Ultrasound can also help the practitioner avoid small bowel adhesions or a distended urinary bladder below the selected entry point. To minimize complications, avoid areas of prominent veins, infected skin, or scar tissue. Ultrasound can also show the practitioner the distance from the skin to the fluid and provide information regarding the expected distance before fluid should be expected in the syringe

   After the patient’s bladder has been emptied, position the patient and clean the area with Betadine or chlorhexidine solution in a circular fashion from the center out (shown), then apply a sterile drape. Explain the procedure to the patient and obtain a signed informed consent, if possible. Explain the risks, benefits, and alternatives

   Use a 5-mL syringe and a 25-gauge needle to create a skin wheal of lidocaine at the entry site (shown).

   Administer 4-5 mL of lidocaine with a longer 20-gauge needle along the expected path of catheter insertion (shown). Be sure to anesthetize down to the peritoneum. Alternate aspiration and injection during insertion until ascitic fluid is noted within the syringe and note the depth of the peritoneum. Obese patients will frequently have a significant amount of adipose tissue and a spinal needle may be necessary to reach the depth of the peritoneum.

   Use the scalpel to make a small nick in the skin (shown) to allow the catheter to pass easily through the skin

   Slowly insert the catheter perpendicular to the skin in small 5-mm increments (shown) to minimize the risk of vascular or bowel injury. Apply constant negative pressure when advancing the needle.

   Loss of resistance will be felt as the needle enters the peritoneal cavity and ascitic fluid will fill the syringe (red arrow). Continue advancing the catheter an additional 2-5 mm (yellow arrow) to avoid misplacement of the catheter when advancing it into the peritoneal cavity.

   At this point, firmly anchor the needle and syringe (blue arrows) to prevent further advancement of the needle into the peritoneum.

   Next, use the opposing hand to hold the catheter and stopcock (green arrow), advancing the catheter over the needle (orange arrow) into the peritoneal cavity. Any resistance when advancing the catheter may indicate that the catheter has been misplaced into the subcutaneous tissue. If this occurs, withdraw the needle and catheter together as a unit in order to prevent the bevel from cutting the catheter.

   While holding the stopcock, withdraw the needle. The self-sealing valve will prevent any fluid leak. The 3-way valve and stopcock control the flow of fluid and prevent fluid leak when no syringe or tubing is attached. Attach a 60-mL syringe to the stopcock and aspirate fluid (shown), then transfer the ascitic fluid to the specimen vials.


   Connect one end of the collection tubing to the stopcock and the other end to the vacuum bottle (shown). Some practitioners recommend administering 25 mL of albumin (25% solution) for every 2 L of ascitic fluid removed. For example, a patient who had a 4-L paracentesis should receive 50 mL of intravenous albumin (25% solution) over 2 hours. The rationale for giving albumin is to avoid intravascular fluid shift and renal failure after a large-volume paracentesis.

   The catheter may occasionally become occluded by the omentum or bowel. If this occurs, clamp the tubing, break the seal from the catheter, gently reposition or rotate the catheter, then reattach and unclamp the tubing. After the desired amount of fluid has been drained, remove the catheter and place a bandage over the puncture site. After paracentesis, some practitioners recommended that the patient remains supine in bed with vital signs checked hourly for 4 hours to monitor for hypotension


   Noninfected ascitic fluid will be transparent and tinged yellow (shown). Possible complications from paracentesis include bowel perforation, hepatorenal syndrome, dilutional hyponatremia, introduction of infection, abdominal wall hematoma, major blood vessel laceration, persistent leak from the puncture site, hypotension after a large-volume paracentesis, and a catheter fragment left in the abdominal wall or cavity.

   Patients with new-onset ascites of unknown etiology should have their peritoneal fluid sent for cytology (shown), cell count, albumin level, culture, total protein, and gram stain. The procedural note should include the following: indications for the procedure, relevant labs (INR, platelet count), procedural technique, sterile preparation, anesthetic used, amount of fluid obtained, character of fluid, estimated blood loss, fluid analysis results, any complications, and the patient’s condition immediately following the procedure. Image courtesy of Wikimedia Commons.
Posted by medica chemistry On 19.17 No comments READ FULL POST

15 Apr 2013

http://reference.medscape.com/
    The 2010 American Heart Association (AHA) guidelines for basic life support (BLS) and advanced cardiac life support (ACLS) represent a departure from how most clinicians were trained. Image courtesy of Wikimedia Commons.
   Do you follow current, best practice for BLS and ACLS? Some of the significant recommendations include:
• Chest compressions as the first step in BLS -- a "C-A-B" (circulation, airway, breathing) approach, instead of the previous "A-B-C" formulation;
• Quantitative waveform capnography to evaluate and monitor advanced airway placement and ventilation;
• Updated indications for medications, including intravenous (IV) epinephrine for pulseless electrical activity (PEA) and asystole, chronotropic agents for symptomatic or unstable bradycardia, and adenosine for the assessment and treatment of stable, monomorphic, wide-complex tachycardia;
• Urgent cardiac catheterization and percutaneous coronary intervention (PCI) in cardiac arrest survivors with ST-segment elevation myocardial infarction; and
• Postresuscitation measures, such as therapeutic hypothermia to improve neurologic outcomes, and maintaining appropriate oxygen saturation and blood glucose to prevent multiorgan dysfunction.

   On rounds, you see an elderly man having an ECG who has collapsed and is unresponsive. The patient's telemetry (top strip of image shown) is abnormal. His 12-lead ECG (lower strips) is on the machine at bedside. Top strip of image shown courtesy of Wikimedia Commons.
   While you await the code team and equipment, which of the following should you perform first?
A. Open the patient's airway with a jaw-thrust or chin-tilt maneuver
B. Perform 2 rescue breaths, either mouth-to-mouth or using a mask with reservoir
C. Start chest compressions immediately at 100 compressions per minute
D. Pour ice on the patient to initiate hypothermic resuscitation

   Answer: C. Start chest compressions immediately at 100 compressions per minute
   The patient has had a cardiac arrest from ventricular fibrillation (VF). Defibrillation is the most appropriate treatment, but while awaiting the necessary equipment you should initiate high-quality chest compressions rather than spending time on advanced airway maneuvers, according to the AHA recommendations.
   The AHA recommends that a first responder to a code situation focus initially on calling for help, and then performing high-quality chest compressions. The new recommendations advise laypersons to focus on compression-only cardiopulmonary resuscitation (CPR). One reason for this change in emphasis is to encourage passersby, who may be reluctant to perform mouth-to-mouth breathing on a stranger, to provide high-quality CPR nevertheless.

   The 2010 AHA guidelines advise providers to perform compressions at a depth of at least 2 inches in adults, and at least one third of the chest diameter in children and infants. Providers must also ensure that there is complete chest recoil between compressions. In a study of VF/ventricular tachycardia (VT) arrests, minimizing interruptions in chest compressions was shown to improve outcome, including both return of spontaneous circulation and survival to hospital discharge. Pulse checks should be 10 seconds long at maximum.
   For adult resuscitations in all settings, the appropriate rate of chest compressions is at least 100 compressions per minute. Initial responders should begin with a pulse assessment, and then proceed to 100-beat-per-minute compressions. Image courtesy of Wikimedia Commons.

   In the 2005 ACLS guidelines, application of cricoid pressure was recommended for an unconscious patient when a third rescuer is available. In the 2010 guidelines, the AHA recommends against routine use of cricoid pressure. The guidelines cite 7 randomized trials showing that cricoid pressure delays advanced airway placement and does not prevent aspiration. Cricoid pressure may still be used during intubation if desired by the healthcare team

   The top strip shows a typical capnography waveform. Appropriate ventilation is shown on the lower left and hyperventilation on the lower right. Hyperventilation is not helpful during resuscitation for cardiac arrest and, in fact, could worsen cardiac output and thus outcome.
   Guidelines recommend use of quantitative waveform capnography to measure end-tidal carbon dioxide and provide easy confirmation of initial advanced airway placement. In addition, it provides continuous assessment of airway and ventilation. This can alert providers to otherwise undetected airway displacement during resuscitation and transport. Also, a sudden rise in end-tidal carbon dioxide during resuscitation is an independent marker of return of spontaneous circulation that can be noted without interrupting chest compressions.
   CPR-assistance devices such as the impedance threshold device and load-distributing band CPR are not recommended, as they have not been shown to improve outcomes. Images courtesy of Wikimedia Commons

   Your next patient was admitted with an apparent myocardial infarction. As you enter the room, he moans and slumps in bed. The patient is unresponsive and pulseless. The team immediately begins high-quality chest compressions while you obtain the rhythm strip from the monitor (shown). You identify it as PEA. Image courtesy of Wikimedia Commons.
   Which of the following should be administered to the patient?
A. Epinephrine
B. Atropine
C. Sodium bicarbonate
D. Calcium gluconate
E. All of the above

Answer: A. Epinephrine
   Give IV epinephrine at the dose for cardiac arrest. This is the mainstay of medical treatment for PEA and asystole (shown), though one should evaluate the patient quickly for any reversible causes. Although previous guidelines recommended atropine for routine treatment of PEA/asystole, it is no longer included in the PEA/asystole treatment algorithm.
   You are able to get a palpable pulse after 4 minutes of ACLS. However, the patient's rhythm strip continues to show the same tracing, and systolic blood pressure is only 75 mm Hg.
   Which of the following should be the next step?
A. Commence external pacing
B. Begin dopamine infusion
C. Begin epinephrine infusion
D. Any of the above is acceptable

Answer: D. Any of the above is acceptable
   External pacing or chronotropic agents (eg, dopamine, epinephrine) are all acceptable treatments for a symptomatic bradycardia. Atropine remains the initial treatment of choice for symptomatic or unstable bradycardia. However, IV infusion of chronotropic agents are now recommended as equally effective alternatives to transcutaneous pacing when atropine fails. Image courtesy of Wikimedia Commons.

   Your last patient on morning rounds was admitted the previous night for palpitations. As you approach the bedside, you note that the patient is sitting up in bed and appears flushed. He states that his palpitations are back. You observe the shown rhythm on the monitor, and you and the team's medical students discuss the various forms of wide-complex tachycardias. Image courtesy of Wikimedia Commons.
   Which of the following should you tell the students is indicated for this patient?
A. Lidocaine
B. Atropine
C. Adenosine
D. Epinephrine

Answer: C. Adenosine
   Other treatment options include amiodarone and electrical cardioversion. The indications for adenosine have been expanded. In the 2005 AHA guidelines, adenosine was recommended for stable, narrow-complex tachycardia consistent with supraventricular tachycardia, such as Wolff-Parkinson-White syndrome (shown). In the 2010 edition, adenosine is also indicated for the initial assessment and treatment of stable, monomorphic, wide-complex tachycardia with a regular rhythm. It should not be used in irregular tachycardia, such as atrial fibrillation.

   Improved neurologic outcomes have been found in response to therapeutic hypothermia. Most of the initial studies on therapeutic hypothermia were performed on patients who presented in VF or VT. Hypothermia should be initiated as soon as possible after the return of spontaneous circulation, with a target temperature of 32°C-34°C.

   This ECG shows evidence of an extensive inferior myocardial infarction. The 2010 AHA guidelines include recommendations in favor of urgent cardiac catheterization and PCI in cardiac arrest survivors who demonstrate ECG evidence of ST-segment elevation myocardial infarction, regardless of neurologic status. There is also increasing support for patients without ST-segment elevation on ECG who are suspected of having acute coronary syndrome (ACS) to receive urgent cardiac catheterization, including patients who present in VF or VT.

   A 75-year-old white man presents to the emergency department with 2 episodes of syncope. He has a history of hypertension, which is being treated with amlodipine, but he is otherwise on no other medications. On examination he is alert, oriented, and in no extreme distress. His blood pressure is 80/40 mm Hg with a heart rate of 50 beats per minute. During examination, he has a recurrent episode of syncope. His telemetry is shown. Image courtesy of Eric Yang, MD.
   While preparations are being made for placement of a temporary transvenous pacer, what should you emergently administer to the patient?
A. IV epinephrine bolus
B. IV dopamine drip
C. IV isoproterenol drip
D. IV atropine bolus

Answer: D. IV atropine bolus
   The guidelines call for use of atropine in patients with symptomatic bradycardia (heart rate approximately 43 bpm, with RR interval marked). While the new guidelines also recommend the use of IV chronotropic agents such as dopamine, epinephrine, and isoproterenol, atropine is still the first-line agent as it can be more quickly administered. In this particular case, given the hypotension, isoproterenol should not be used if an IV chronotropic agent is needed after atropine administration. Image courtesy of Eric Yang, MD

   The AHA "Key Objectives" of post-arrest care are shown. In addition to the use of therapeutic hypothermia, the need to treat ACS immediately, and other key objectives, the 2010 AHA guidelines emphasize treating and preventing multiorgan dysfunction. Specific suggestions for prevention of multiorgan dysfunction include avoiding hyperventilation and maintaining euglycemia. Multiple studies have shown improved outcomes when these parameters are maintained. Another specific new recommendation is to wean the arrest survivor's oxygen to maintain saturations between 94% and 99%, to prevent hyperoxygenation, which may be associated with poor outcomes

   In summary, changes in the 2010 AHA ACLS protocols include the following:
   Chest compressions at a rate of 100 per minute, with minimal interruptions, are now recommended as the first step in resuscitation -- a C-A-B approach, instead of the previous A-B-C formulation. Cricoid pressure does not prevent aspiration and may delay advanced airway placement.

   Quantitative waveform capnography provides an improved means to evaluate and monitor advanced airway placement and ventilation. CPR assistance devices have not been shown to improve outcome and are not recommended.

   IV epinephrine is recommended in place of atropine for the treatment of PEA and asystole. For symptomatic or unstable bradycardia that fails to respond to atropine, chronotropic agents may be considered as an alternative to pacing. Indications for adenosine now include the initial assessment and treatment of stable, monomorphic, wide-complex tachycardia with a regular rhythm


   Urgent cardiac catheterization and PCI are favored for cardiac arrest survivors who demonstrate ECG evidence of ST-segment elevation myocardial infarction, as well as for patients with ACS. Measures for postresuscitation care include therapeutic hypothermia to improve neurologic outcomes, and avoiding hyperventilation and maintaining euglycemia to prevent multiorgan dysfunction.
Posted by medica chemistry On 23.02 No comments READ FULL POST

11 Apr 2013

Anticipating and recognizing respiratory decompensation is only the first step in emergency airway management. Practitioners must be familiar with the indications and techniques for airway intervention and how to anticipate a difficult airway. The basic approach includes assuring airway patency, protection from aspiration, and providing adequate oxygenation and ventilation. This image shows the use of a GlideScope® (Verathon Inc.; Bothell, Washington) video laryngoscope to intubate the trachea of a morbidly obese patient with challenging airway anatomy. Image courtesy of Wikimedia Commons

Upper airway patency can be determined by assessing for stridor, drooling, hoarseness, edema, and facial trauma or burns. The most common cause of airway obstruction in the supine patient with a reduced level of consciousness is the tongue (yellow arrow). The head-tilt chin-lift maneuver gently extending the head slightly into the "sniffing position" (right image) and lifting the tongue from the back of the throat is the most reliable method of opening the airway when cervical spine injury is not suspected. Hyperextension of the neck is not recommended and may actually cause obstruction. Images courtesy of Wikimedia Commons

Airway adjuncts relieve upper airway obstruction caused by the tongue by lifting the tongue from the back of the hypopharynx. Airway adjuncts provide a conduit for ventilation, oxygenation, and suctioning and can be used with bag-valve-mask (BVM) ventilation. The oropharyngeal airway (OPA; left image) comes in a variety of adult and pediatric sizes and is sized from the corner of the mouth to the earlobe (right image). With a tongue blade to depress the tongue, the OPA is inserted over the tongue. Alternatively, the OPA can be placed upside down into the patient's mouth with the tip aimed at the soft palate and rotated 180°. OPAs are contraindicated in patients with a gag reflex because they may cause vomiting and aspiration and are poorly tolerated

Another airway adjunct is the nasopharyngeal airway (NPA). NPAs, like the OPA, can help prevent upper airway obstruction caused by the tongue. However, the NPA can be used in a conscious patient with an intact gag reflex. NPA devices can be inserted bilaterally if necessary. NPAs are measured from the nostril to the earlobe and are inserted with the bevel toward the nasal septum straight back along the floor of the nose (shown) until the flare rests against the nostril. Use of water-based surgical lubricant and choosing the larger of the 2 nostrils can make insertion less traumatic. Due to the risk for epistaxis or nasopharyngeal injury, NPAs are contraindicated in patients who are anticoagulated; have basilar skull fractures, nasal deformities, or nasal infections; and pediatric patients

BVM ventilation is the most important skill in basic airway management. Simple maneuvers and basic airway adjuncts can ensure a patent airway and allow for effective oxygenation and ventilation until a more definitive airway is established. BVM ventilation requires a good mask seal and a patent airway. The presence of facial hair, absence of teeth, obesity, and anatomic irregularities are factors that can make BVM ventilation difficult. Masks come in many sizes including newborn, infant, child, and adult. Choosing the appropriate size will help to create a good seal and effective ventilation

While providing BVM ventilation, extend the patient's head slightly using the head-tilt chin-lift maneuver. If cervical spine injury is suspected the modified jaw-thrust technique is used instead. Place an OPA or NPA to assist with ventilations. The mask should cover the nose and mouth without extending over the chin. The mask is held in place with the 1-handed E-C technique. Using the nondominant hand, create a C shape with the thumb and index finger (left image) over the top of the mask and apply gentle downward pressure. Hook the remaining fingers around the mandible taking care not to apply pressure to the soft tissues of the neck, and lift it upward toward the mask creating the E (right image). Leave dentures in place to improve mask seal

The 2-handed technique is preferred if a second person is available to provide ventilations. Create 2 opposing semicircles with the thumb and index finger of each hand to form a ring around the mask connector, and hold the mask on the patient's face. Lift the mandible with the remaining digits (left image). Alternatively, place both thumbs opposing the mask connector and use the thenar eminence to hold the mask to the face while lifting the mandible with the fingers (right image)

Endotracheal intubation is a critical, often lifesaving procedure for severely ill or injured patients who cannot maintain adequate oxygenation, perform effective ventilation, or maintain a protected airway. Intubation is also often used when a patient is at risk for serious deterioration or is considered unstable and needs a procedure or transfer that requires leaving the resuscitation room environment. Intubation is usually performed with a conventional laryngoscope (shown), flexible fiberoptic bronchoscope, or video laryngoscope. Proper airway management requires a thorough understanding of the indications for tracheal intubation, the pharmacology of sedative and neuromuscular-blocking agents used in rapid sequence intubation (RSI), and the proper methods for endotracheal tube placement

Prepare your equipment: Endotracheal tubes (ETT) (shown) come in a number of sizes, usually designated in millimeters of internal diameter. The choice of ETT size is always a compromise between choosing the largest size to maximize flow and minimize airway resistance and the smallest size to minimize airway trauma. A high-pressure/low-volume balloon at the distal tip is inflated after insertion and effectively seals off the trachea preventing aspiration and ensuring adequate ventilation and oxygenation. A malleable stylet should be used during intubation to provide shape and strength to the ETT. It is inserted into the lumen of the ETT with the tip 1-2 cm from the distal end of the ETT. Do not let the stylet protrude beyond the ETT tip because this may cause airway trauma. Image courtesy of Wikimedia Commons

The laryngoscope is a rigid instrument used to facilitate intubation of the trachea. The 2 main components are a cylindrical handle (left) and the blade. The most commonly used blades in the United States are the Macintosh and the Miller. The curved Macintosh (center) is designed to have the tip placed in the vallecular space anterior to the epiglottis. The epiglottis is then elevated indirectly to expose the vocal cords. The Miller blade, which is straight, is placed under the epiglottis, which is lifted directly to expose the vocal cords (right). Both blades come in a variety of sizes. The choice of blade depends on personal preference and patient anatomy

Setting up and preparing for intubation includes checking that all equipment is working. Oxygen with face mask or BVM is available or currently being used to preoxygenate the patient. Suction is available, working and within hands reach. You should always anticipate a difficult airway and have rescue airway equipment such as a coude-tip bougie (shown), laryngeal mask airway (LMA), GlideScope, or surgical cricothyrotomy kit available

When pre-oxygenating using manual ventilations with the BVM (shown), remember to squeeze the bag once every 5 seconds delivering volumes just enough to cause the chest to rise. Gastric inflation can occur when the bag is squeezed too forcefully or too quickly. The ventilatory rate should not exceed 10-12 breaths per minute. Use a tidal volume of approximately 8-10 mL/kg or just large enough to cause chest rise. During cardiopulmonary resuscitation, smaller tidal volumes (5-6 mL/kg) are adequate because of the reduced cardiac output of such patients. Contraindications to bag-valve mask include severe facial trauma and airway obstruction. A surgical airway is often indicated in these patients

A difficult airway assessment must be performed before attempting intubation, especially when using neuromuscular-blocking agents. The mnemonic "LEMON" is a helpful tool to focus on evaluation for a potentially difficult airway. "L" = Look for signs of obesity, micrognathia, evidence of previous head and neck surgery or irradiation, facial hair, poor dentition, dentures, large teeth, a narrow face, a high and arched palate, a short or thick neck, and facial or neck trauma. "E" = Evaluate the 3-3-2 rule. Normal mouth opening is 3 of the patient's fingerbreadths. Hyomental distance (left image) when measured should be at least 3 fingerbreadths, whereas the thyrohyoid distance (right image) should be at least 2 fingerbreadths

"M" is for Mallampati classification, which is performed with the patient seated and neck extended. Open the patient's mouth fully; protrude the patient's tongue; and say "ah." The classes are as follows: Class I: soft palate, uvula, fauces, and pillars visible = no difficulty; Class II: soft palate, uvula, and fauces visible = no difficulty; Class III: soft palate and base of uvula visible = moderate difficulty; Class IV: only the hard palate is visible = severe difficulty. Image courtesy of Wikimedia Commons

"O" is for Obstruction. Evaluation for foreign bodies (arrow), stridor, and other forms of sub- and supraglottic obstruction should be performed in every patient prior to laryngoscopy.

"N" is for Neck mobility. Patients with degenerative or rheumatoid arthritis may have limited neck motion, and this should be assessed to ensure the ability to adequately extend the neck during laryngoscopy and intubation. Patients in whom traumatic cervical spine injury (shown) is suspected and in whom the cervical spine has been immobilized by a cervical collar have limited neck mobility.

The formal steps of RSI are shown. There are 2 essential components: induction and paralysis. Induction refers to creating an unresponsive state by the administration of a sedative such as etomidate or propofol. Paralysis refers to causing muscular relaxation by the administration of a paralytic agent such as succinylcholine or vecuronium. RSI maximizes the rate of successful intubation, decreases the risk for aspiration, and offers better C-spine control. The risks of undertaking RSI should be well understood, including prolonged intubation time, adverse drug effects, and development of a crash airway where none previously existed. RSI is unnecessary and inappropriate in patients who are in cardiac arrest.

The modified jaw-thrust technique (shown) can be employed in patients in whom a cervical spine injury is suspected. When properly performed, it can be accomplished without extending the neck. This maneuver uses the mandible to displace the tongue anteriorly, minimizing the tongue's ability to obstruct the airway. While standing at the head of the patient's bed, place the heels of both hands on the temporal-parietal areas on each side of the patient's head. Grasp the angles of the mandible with your fingers, and without flexing or extending the neck, displace the jaw anteriorly.

Once the patient is preoxygenated, sedated, and paralyzed, placement of the ETT is performed by introducing the blade into the right side of the mouth sweeping the tongue to the left and lifting the tongue up into the floor of the pharynx. Once a view of the larynx is obtained via laryngoscopy, the ETT is introduced with the dominant hand through the right side of the mouth (shown). Directly observe the tip of the tube passing into the larynx, through and 1 cm past the vocal cords. The distal cuff is inflated and positive pressure ventilations are provided. The lungs are immediately auscultated bilaterally for equal breath sounds as end-tidal CO2 is measured. Note the depth of insertion of the ETT at the lip line and secure the tube in place

Once the ETT has passed through the vocal cords, the stylet is carefully removed and the distal balloon cuff inflated with a 5- to 10-cm3 syringe. A BVM is attached, and the patient is manually ventilated to assess breath sounds and lung compliance. Confirmation of placement and proof includes visualizing the tube passing through the vocal cords (shown); equal breath sounds should be auscultated bilaterally with an absence of breath sounds over the epigastric area in the adult (pediatric patients may have referred breath sounds). The cartilaginous tracheal rings are also shown here (yellow arrow)

A postintubation chest x-ray does not confirm tube placement, but will evaluate the depth of ETT insertion (yellow arrow) in relation to the carina (red arrow), left or more commonly right mainstem bronchus intubation, and complications such as pneumothorax. An orogastric tube is then often placed to decompress the stomach, and an arterial blood gas is obtained and evaluated

The LMA is used as a rescue airway device to ventilate patients when traditional endotracheal intubation is impossible. The LMA is a cuff device that provides sufficient seal to allow positive-pressure ventilation to be delivered. It is especially useful in cases in which the laryngoscopic view is limited by an inability to optimally position a patient's neck, as in cases of trauma. Although the LMA may make ventilation easier, it does not protect the airway the way in which a cuffed ETT does, and thus it is desirable to transition to a cuffed ETT as soon as feasible. Difficult or failed bag-mask ventilation and failed intubation are the most common reasons for using the LMA in the emergency setting

An LMA has a large bore tube with a connector at the proximal end that is connected to a BVM or ventilator. The elliptical cuff at the distal end is inflated after insertion to form a low-pressure seal around the entrance into the larynx. The LMA comes in a variety of pediatric and adult sizes, and successful insertion requires appropriate size selection. The LMA will usually have the size, the suggested weight, and required volume of air needed to properly inflate the cuff (shown) printed on the side. The LMA is usually a successful device for rescue ventilation in the "cannot-intubate/cannot-ventilate" situation. Advanced cardiac life support guidelines suggest that the LMA provides a more secure and reliable means of ventilation than BVM ventilation

In preparation for LMA insertion, inflate the cuff to ensure that it does not leak. Then deflate the cuff to form a smooth flat wedge shape (left image) that will pass easily around the back of the tongue and behind the epiglottis. Use a water-soluble lubricant to lubricate the back of the LMA. The best patient position for LMA insertion is the sniffing position, with the neck flexed and the head extended, unless the patient has a suspected or known neck injury. Insert the LMA with the posterior tip pressed against the hard palate just behind the upper incisors. Under direct visualization, use the index finger to slide the LMA along the hard palate and into the oropharynx (right image)

While inserting the LMA, extend the index finger and push the cuff along the soft palate and into the posterior pharynx (left image) while the other hand provides counterpressure on the back of the patient's head (right image). Push the LMA into the hypopharynx until you feel resistance. After the LMA is inserted, inflate the cuff just enough to achieve a good seal with the glottis, which may only require half of the maximum cuff volume. Never overinflate the LMA cuff. Finally, attach a bag and ventilate the patient using chest rise, breath sounds, and capnography to confirm adequate gas exchange. The LMA does not completely protect against aspiration and may actually cause vomiting if the patient is not fully sedated

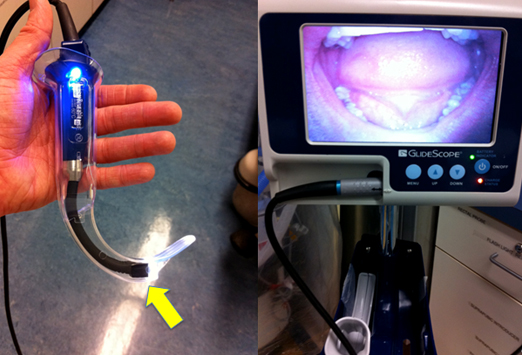
Video laryngoscopy affords more grade 1 and 2 views than direct laryngoscopy and improves glottic exposure in most patients with poor direct glottic visualization. The GlideScope video laryngoscope works primarily like a traditional laryngoscope with a 60° angulated Macintosh blade (left image). The video feed is projected onto an accompanying screen (right image). The digital video camera and light source are located at the point of angulation of the blade (arrow). The plastic blades are disposable and come in different sizes. Indications for GlideScope video laryngoscopy include morbid obesity, poor direct laryngoscopic view from trauma or anatomic variation, inability to view the vocal cords, small mouth opening (< 3 cm), limited neck extension, or suspected cervical spine injury

While looking at the mouth, insert the GlideScope into the midline of the oral cavity (left image). Then while looking at the monitor, elevate the tip of the blade to see the epiglottis and vocal cords (right image). Next, while looking at the mouth, insert the ETT and stylet into position near the tip of the GlideScope. The GlideScope has an antifogging heat lamp that heats up to 106° in 10 seconds enabling views in the presence of blood and secretions. Excessive blood and secretions should always be suctioned

While looking at the monitor, with the tip of the ETT at the vocal cords, gently pull back the stylet 1-2 cm and pass the tip to the ETT through the vocal cords intubating the trachea (shown). In clinical studies, GlideScope intubation was almost twice as successful and one third faster than conventional laryngoscopy

If oral intubation has failed and you are unable to oxygenate or ventilate using an airway adjunct, a cricothyrotomy can be employed to establish airway control with a tracheostomy tube. Other indications for a cricothyrotomy are massive oral, nasal, or pharyngeal hemorrhage; masseter muscle spasm; clenched teeth; structural deformities of the oropharynx; stenosis of the upper airway; laryngospasm; mass or tumor; airway obstruction; and oropharyngeal edema. Tracheostomy tubes come with an inflatable balloon and variable luminal diameters. The chosen tube should be three fourths the diameter of the trachea

When performing a cricothyrotomy, if you are right-handed, stand on the patient's left side and palpate the depression over the cricothyroid membrane with the nondominant hand. With the dominant hand, use a scalpel to make a single vertical 1.5-cm incision through the skin and subcutaneous tissue and then a horizontal incision through the cricothyroid membrane (red arrow).

With the scalpel blade still in place and a tracheal hook in the nondominant hand, using the inferior aspect of the scalpel blade as a guide, hook the cricoid cartilage with the tracheal hook. Then in a manner similar to the traction applied during oral laryngoscopy, use the hook with the nondominant hand to pull upward providing traction to dilate the membrane and stabilize the trachea (shown)

Next place a size 4 cuffed tracheostomy tube or size 6.0 cuffed ETT through the opening (shown). Often the most difficult part of this procedure is placing the tracheostomy tube into the small incision. An alternate approach is to pass a gum elastic bougie into the trachea first and then advance the ETT over the bougie. If using a tracheostomy tube, with trocar in place and outer cannula lubricated, insert the tip through the opening initially oriented in the transverse plane parallel with the Trousseau dilator. Rotate the dilator and tube together 90° inferiorly, and then advance the tube until the flange rests against the neck

Once the flange of the tracheostomy tube is flush against the neck, inflate the cuff and remove the trocar and the hook (shown). Proper placement of the tracheostomy tube is confirmed in the same manner as with ETT placement: assessment of end-tidal CO2 partial pressure, bilateral chest movement, and breath sounds. After confirming proper placement, suture the tracheostomy tube into place and obtain a postprocedure chest x-ray
Posted by medica chemistry On 23.41 No comments READ FULL POST

Follower

    Blogger news

    Blogroll

    About